Creating List of Network Hosts
![]() Calling Network Scanning Wizard
Calling Network Scanning Wizard
![]() Step 1. Configuring Parameters for Automatic Traffic Sensor Creation
Step 1. Configuring Parameters for Automatic Traffic Sensor Creation
![]() Step 2. Adding IP Address Ranges
Step 2. Adding IP Address Ranges
![]() Step 3. Selecting Scanning Methods and Configuring Options
Step 3. Selecting Scanning Methods and Configuring Options
![]() Step 4. Searching and Selecting Computers for Adding to Monitoring List
Step 4. Searching and Selecting Computers for Adding to Monitoring List
![]() Step 5. Selecting Network Interfaces for Traffic Sensor Creation
Step 5. Selecting Network Interfaces for Traffic Sensor Creation
![]() Step 6. Adding Found Hosts to Monitoring List
Step 6. Adding Found Hosts to Monitoring List
Use the Network Scanning Wizard to create a list of network hosts. It takes a few steps to complete the scanning process:
![]() 1. Calling the Network Scanning Wizard.
1. Calling the Network Scanning Wizard.
For the purpose, click the File item on the main menu, and then select Scan Network.
![]() 2. Selecting a scanning method.
2. Selecting a scanning method.
The Wizard allows using the following two methods for searching network devices:
- Scanning IP range
This method allows you to spot the maximum number of devices. It features the following advantages:- High scanning speed because of multithreading
- Recognition of diverse hardware types: printers (local and network), switches, hubs, servers, database servers, routers, WiFi access points, etc.
- Combination of several efficient network hardware search methods (ICMP ping, scanning a series of TCP ports, ARP requests)
- Obtaining data from hardware via SNMP (switches, printers, WiFi, etc.)
- allows you to scan several IP ranges at once
- Importing from the Network Neighborhood
This method works somewhat faster than the other one; however, not all devices are guaranteed to be found (computers only). Follow the Wizard prompts while importing from the Network Neighborhood.
What we are to learn in detail is the scanning IP address range.
![]() Step 1. Configuring Parameters for Automatic Traffic Sensor Creation
Step 1. Configuring Parameters for Automatic Traffic Sensor Creation
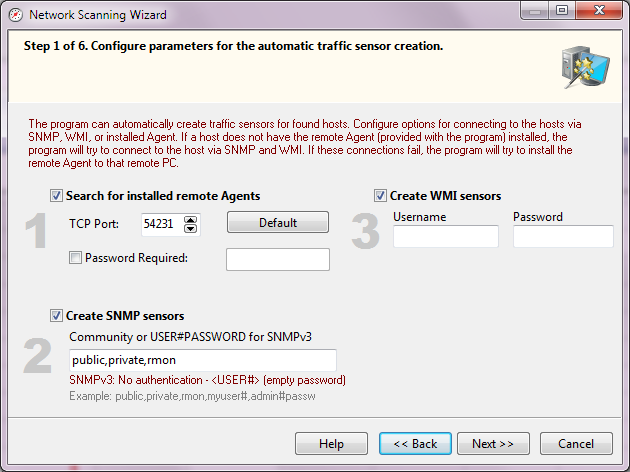
The program can scan your network and create and configure some traffic sensors automatically (What is the traffic sensor?). If remote Agents are installed on computers, select this option to find them and create sensors for them. If your network contains devices with running SNMP, select the SNMP option and provide correct community strings. If you have admin rights on some Windows PCs, select the WMI option to read the network bandwidth and traffic data from them via WMI.
![]() Step 2. Adding IP address ranges
Step 2. Adding IP address ranges
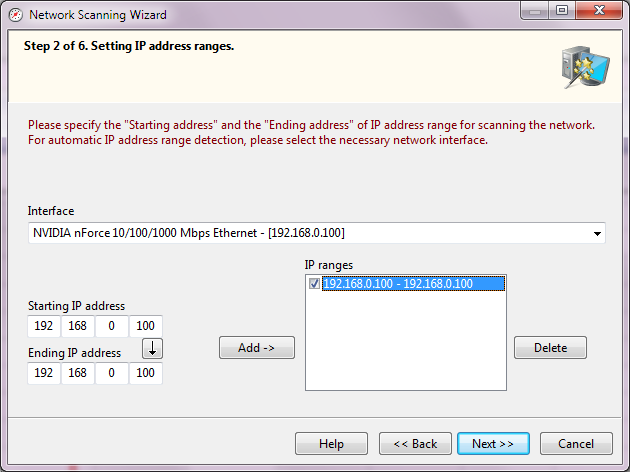
On the second step, we add IP ranges to be scanned. To do this, please perform the following steps:
1. In the Starting IP address and Ending IP address fields, enter IP addresses of the range to be scanned. To automatically detect the range of IP addresses applicable to your network, select a necessary network Interface.
2. Once the address fields are filled in, click on the Add-> button and the selected range will be added to the list of IP ranges to be scanned. To Delete a range from the list, simply click on the corresponding button. Select the IP address ranges on the list to be scanned.
3. Click the Next >> button.
![]() Step 3. Selecting scanning methods and configuring options
Step 3. Selecting scanning methods and configuring options
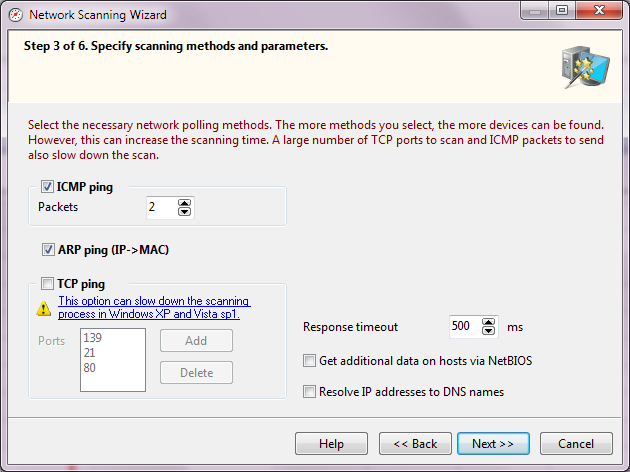
The Wizard allows you to choose from three different methods for searching for devices on a network:
- ICMP ping
The Packets parameter defines the number of ICMP packets to be sent by the application to each address to be scanned. In heavy-load networks, sending just one packet may be insufficient to receive a response from an existing host. In this case, it is recommended that you set at least 3-4 packets.
- Scanning TCP Ports
Scanning TCP ports requires a list of Ports, by which the devices can be found on a network. The most widespread open ports in Microsoft networks are 139 (NetBIOS), 21 (FTP), 80 (HTTP).
IMPORTANT! When selecting a port scanning method, please keep in mind that in the majority of cases firewalls can consider your actions as an attack if you scan several ports on a host at a time, and that may cause the respective consequences.
Windows XP SP2 and some newer operating systems do not allow scanning groups of TCP ports simultaneously and intentionally slow down the process on the driver level. Learn more about the TCP scanning limitation...
- ARP Ping (IP->MAC).
ARP requests are attempts to resolve a host's MAC address by its IP address. If the MAC address can be resolved, the Wizard will add the host to the list of search results. There is a chance that the program can find non-existing hosts. It happens because the address table in a switch can keep the old or reserved data. In such cases, clear the checkboxes next to the items in the results window.
For all scanning methods you must set the Response timeout, which defines for how long the wizard should wait for a response from the host being scanned.
The wizard can automatically find all servers, database servers on your network, obtain other useful information on found computers (OS type, comment, etc.). For the purpose, you need to select the Get additional data on hosts via NetBIOS option. This function will work only if the NetBIOS protocol is allowed on your computer and in other computers in your network. If the NetBIOS protocol is disabled or not properly configured on your network, the program will not be able to get that additional data on hosts and can even hang for a while.
To speed up the scanning process, you can disable the Resolve IP addresses to DNS names option. In this case, the program will only show IP addresses without DNS names.
ADVICE: If the program scans your network slowly or even hangs, please disable the NetBIOS and DNS options and try again.
After all the parameters have been set, the Wizard will continue the actual scanning of the network. To move on to the scanning step, click on the Next>> button.
![]() Step 4. Searching and Selecting Computers for Adding to the Monitoring List
Step 4. Searching and Selecting Computers for Adding to the Monitoring List
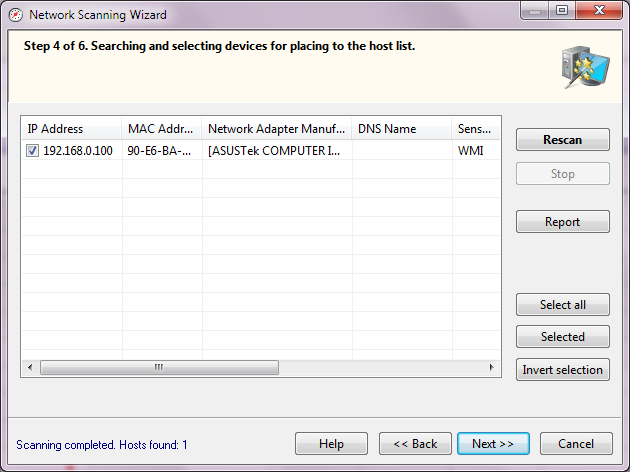
The scanning process starts immediately. First, the application attempts to detect networked and local printers. This procedure may take long time. During the process, the application may fail to respond to requests, and the Stop button will be unavailable. Next, the scanner will search for devices through NetBIOS, what also may take some time. After the completion of the two preparation procedures, the application starts the actual search through all IP addresses within the ranges originally defined. The progress of the process will be indicated by the progress indicator and the "Scanning IP range... " status in the bottom-left corner of the Wizard.
The process can be stopped by clicking on the Stop button.
Hosts found during the scanning will be added to the results list. There is a way to change the type of the device found from the results window. For that purpose, select the required record (multiple selection is allowed), and then open the context menu. On that menu, select the device type to be set.
You can have the program add only selected hosts to the monitoring list by selecting those hosts on the result list. The buttons Select All, Invert Selection will help you with the selection of multiple devices. Click the Report button to export all scanned information (with the scanning settings and parameters) to a CSV file. All the network scanning parameters will be also exported to this file.
This report can help the developers of the program give you a hand if you stumble over any problems when forming the list of network hosts.
When the scanning process is over, move on to the final step by clicking on the Next >> button.
![]() Step 5. Selecting Network Interfaces for Traffic Sensor Creation
Step 5. Selecting Network Interfaces for Traffic Sensor Creation
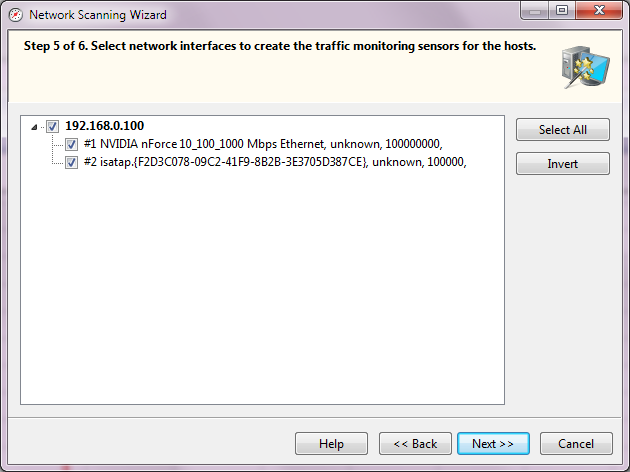
On this step, the wizard will try to get the list of network interfaces from each host found on the previous step. You need to select the interfaces whose bandwidth and traffic you want to monitor. The number of created sensors will be equal to the number of the selected interfaces.
If the remote agent sensor type is used on a host, only one interface can be monitored. This is due to the sniffer's operation pecularity. The sniffer driver can operate with one network interface at once.
![]() Step 6. Adding Found Hosts to Monitoring List
Step 6. Adding Found Hosts to Monitoring List
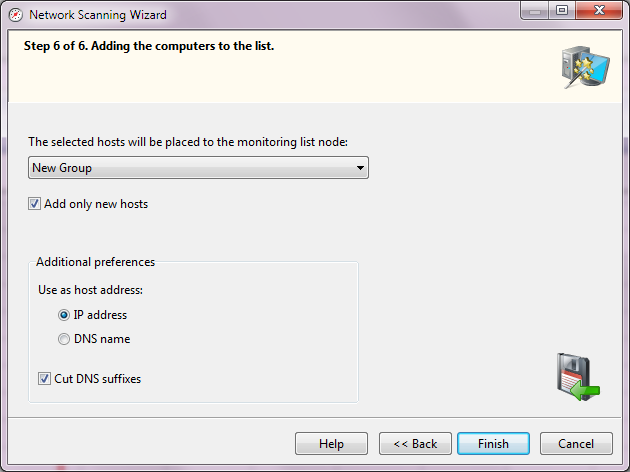
On this final step, the wizard will prompt you to select a node on the monitoring list, where it would place the hosts it has found. Before placing the found hosts on the list, you can set additional parameters:
- You can specify, what the wizard has to Use as a host address: the host's IP address or its DNS name. For networks with the dynamic IP address allocation, select the DNS name option, for this attribute in this case will remain constant. For networks with static IP addresses you can select using the host IP address as the name.
- Cut DNS suffixes. The Wizard can use the specific DNS address of devices as a hosts name. Often, such names contain suffixes, for example: mary.dep1.orgname.com. When this parameter is selected, the host name will be displayed as mary.
Once you have clicked Finish, the found hosts and created traffic sensors will be added to the selected node.
After finishing the scanning process, the program can propose you to install agents on the remote computers where no traffic sensors were created (could not connect to WMI, SNMP, or agent). The agent installation can be done automatically and remotely if you have administrator rights and the admin$ share is available on the remote PC. If the agent installation finishes successfully, the program will scan the network again and add the new sensors to the host tree.
Learn more about the agent installation in the Installing and Configuring Agents. Installing WinPCap Driver topic.