Installing and Configuring Agents. Installing WinPCap Driver
The remote agent is a Windows service application to be installed on remote computers that allows you to receive traffic values from network interfaces of these PCs using the client server mechanism (via the TCP protocol) . This allows you to monitor network bandwidth and traffic usage.
The agent can help you when the SNMP or WMI sensors cannot be used for some reason on your network. Moreover, if you want to monitor bandwidth by protocols or to distinct the Internet and local traffic consumption on your network, the agent service used together with the WinPcap sniffing driver will be the only solution for this case.
The agent can be installed on network computers manually and automatically from the program or using Windows Group Policy.
The agent installation files are located in the program folder's sub-folder named Agent (<disk>:\Program Files\10-Strike Bandwidth Monitor\Agent\). The agent installation files are named bandwidth-monitor-agent.msi and bandwidth-monitor-agent.exe. You can use either of them for the agent installation. The .exe file is for manual interactive installation process. The .msi file is for automatic Group Policy installation.
 Automatic Agent Installation
![]() Using the Program's "Remote Agent Installation" Function
Using the Program's "Remote Agent Installation" Function
The program can automatically install the agents on remote computers if you have administrator rights and the admin$ share is available on them. Select the Monitoring | Install, Uninstall or Update Remote Agents... item in the main menu.
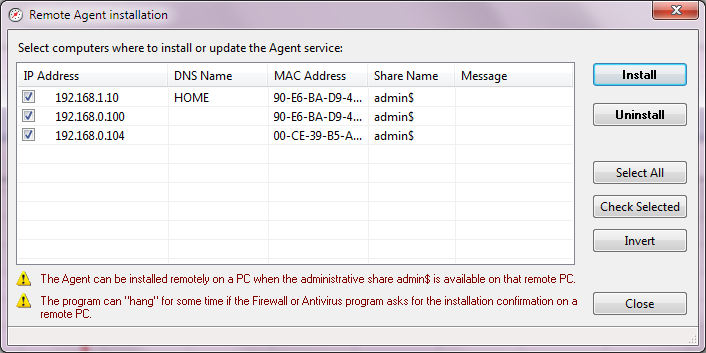
The Remote Agent installation window will appear. This list contains computers available in the current monitoring database. Select computers where you want to install or update the bandwidth monitoring agent service and click Install.
WARNING! You need admin rights and the admin$ share with full access rights on the remote PCs. Otherwise, the program will not be able to install the agents remotely.
If the installation process cannot be completed, you will see the error message in the Message column. Fix the problem or contact us and we will try to help you.
The agent can be removed from the remote computers in the same way. Select necessary computers in the list and click Uninstall.
The installation process can "hang" sometimes. This happens when the firewall or antivirus program displays a message or a confirmation window on a remote PC and waits for user input. The process will be continued automatically once that user confirms the request or adds the installation modules to the firewall's list of exceptions.
![]() Automatic Agent Installation using Group Policy
Automatic Agent Installation using Group Policy
The agent package can be installed remotely on domain computers using the Group Policy. Using this method, you can save your time because you do not have to copy the agent installation package on each PC and run it. Learn more about the remote agent deployment: Installing remote agents on domain computers using Group Policy.
Manual Agent Installation
To install a remote agent on a remote computer, please perform the following steps:
- Copy the agent installation package bandwidth-monitor-agent.msi file (or bandwidth-monitor-agent.exe) from the folder <disk>:\Program Files\10-Strike Bandwidth Monitor\Agent\ to the remote computer or copy the file to a public share.
- Run the installation file bandwidth-monitor-agent.msi on the remote computer. Please wait until the installation process finishes.
To configure the remote agent, run the agent configuration utility. The utility is installed together with the agent service (into the same program folder). You can start the agent configuration utility using the Start menu: Start | Programs | 10-Strike Bandwidth Monitor Agent | Configure 10-Strike Bandwidth Monitor Agent.
To apply the configuration changes, you need to restart the agent service 10-Strike Bandwidth Monitor Agent Service (the service name is Svc10StrikeBMAgent).
The bandwidth-monitor-agent.msi file can be installed silently in the background mode. To do this, start the file with the /quiet key. You can learn more about other keys by starting the .msi package with the /? key.
Installing WinPcap
For the successful distinct protocol and Internet traffic monitoring using the "Packet sniffing" type of sensor, you need to install the WinPcap network sniffing driver on that machine where you have installed the bandwidth monitoring agent service on the previous step. The WinPcap driver installation file WinPcap_x_x_x.exe will be started automatically when you install the agent. Follow the instructions displayed on the screen. The latest WinPcap version is always available for download here: http://www.winpcap.org/install/.
If a computer already has the WinPcap driver installed, you can cancel the WinPcap installation procedure.