Printing Network Map
![]() To print the map, select File |
Print... on the program's main menu, or click the button on the toolbar.
To print the map, select File |
Print... on the program's main menu, or click the button on the toolbar.

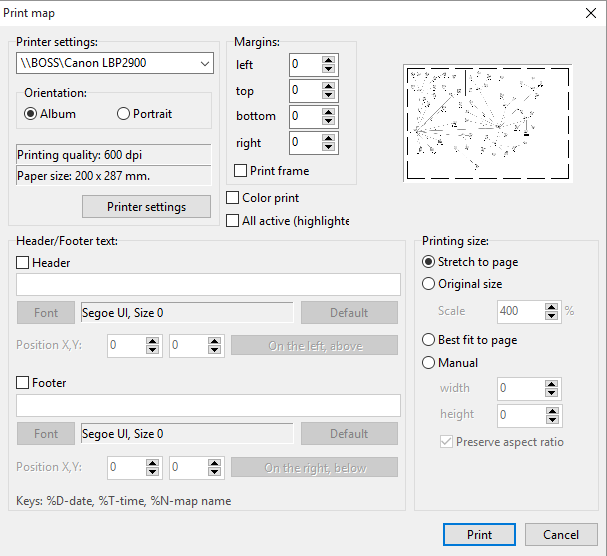
Fig. 1. The Print map window.
![]() You can set the following parameters (fig. 1):
You can set the following parameters (fig. 1):
- Printer name - If you have several printers connected to your PC, you can select one of them for printing.
- You are albe to set paper orientation if necessary. It is recommended that you use the Album orientation.
- You are able to change printer settings before printing. Paper size and printing quality (dpi) will be displayed in the appropriate fields.
- You can set margins for optimal map layout on paper (displayed as short dotted line in preview window). Hardware margins are also taken into account (displayed as long dotted line in preview window).
- A frame can be printed around the map.
- If "Print background" is checked the map will be printed with the background image (as you see it on the screen). Otherwise, the background will be printed white; lines, areas, and text labels will be printed black (the map may blink at that moment). This feature can save printer's ink.
- If you need all devices to appear as active (highlighted) on the printed map, select the All active (highlighted) option.
- Set printing size parameters to define size and position of the printed map on paper. You can:
- stretch the map to page (aspect ratio may be changed)
- use original size, and scale it
- set length and height manually, preserving aspect ratio or not.
- You are able to add your own text labels on the printing: header and footer. You can adjust style, color, and size of font. Postions of header and footer can be changed too (automatic binding to the map region is available). Use the following keys to add current date, time, and map name to header/footer: %D - current date, %T - current time, %N - map name.